- How To
- Polish
- Community
How To Take Social Media Nail Photos In The Best Lighting
April 18, 2022
Social media has made the world a small place. From one side of the globe to the other, it’s possible to connect with people from different countries and continents. And when it comes to social media for nails, it can feel overwhelming. So for the next several months, we’re proud to be partnering with nail artist and PP friend Jennie Shaw for a social media series. We hope you’ll find some helpful tips for your nail polish images! Take it away, Jennie.
Hello there, PP community! I’m delighted to present the first of three blog posts in an ongoing social media series. I’ll be covering topics like lighting, tips for making reels, and different ways to make your pictures pop. With pressure to post multiple times a week—sometimes even multiple times per day—streamlining the process can make your life easier in several ways. Editing apps are easy to download on most smartphones, but every edit takes time. Multiply that by anywhere from 5- 10 photos per week, and it adds up. By outlining the basics and adding in some Pro Tips, I hope to empower you with the knowledge you need to make social media work for you!
A bit about me:
I’ve been painting nail art and posting pictures on Instagram for longer than I care to admit, and I’ve learned a lot over the years. From personal posts to sponsored content with major brands, I’ve made some mistakes along the way. Oh yes. So many mistakes. For instance, relying on sunshine but then being bombarded with unexpected rainy days. Some of you haven’t crouched in your bathtub with a small yellow-tinged desk lamp to attempt to take pictures of detailed nail art, and it shows.
This brings me to our first social media post: lighting. Because above all else, lighting can make or break your nail polish images. No matter what equipment you use, lighting is crucial. In fact, it’s the foundation for any photography or video. But not all lighting is equal, and there are elements to consider. Let’s break down some lighting basics and must-haves.
Goals for Lighting
To showcase your work.
To minimize editing.
To create clear and professional-looking photographs.
Types of Lighting for Nail Photography
Sunlight – The giant fiery orb in the sky, mostly accessible to all.
PROS: Nature’s brightest light source means you’ll get crisp details of your nails. Plus, it’s the sun, so there’s no cost. While outdoors, sunlight is more directional, increasing shadows. But when it comes to artistic photography that plays with light and shadow, it’s hard to beat direct sunlight.
CONS: In some places, sunlight isn’t consistent or reliable. While artistic pictures are beautiful, the dark shadows can hide nail details. Direct sunlight can also make lighter skin glare or seem harsh, depending on the angle. Taking pictures on a sunny day in the shade is more flattering for your skin but not as effective for awesome nail photos.
Pro Tip: Taking indoor pictures using direct sunlight means that your window acts as a filter of sorts. This diffuses the light more broadly, softening the skin.
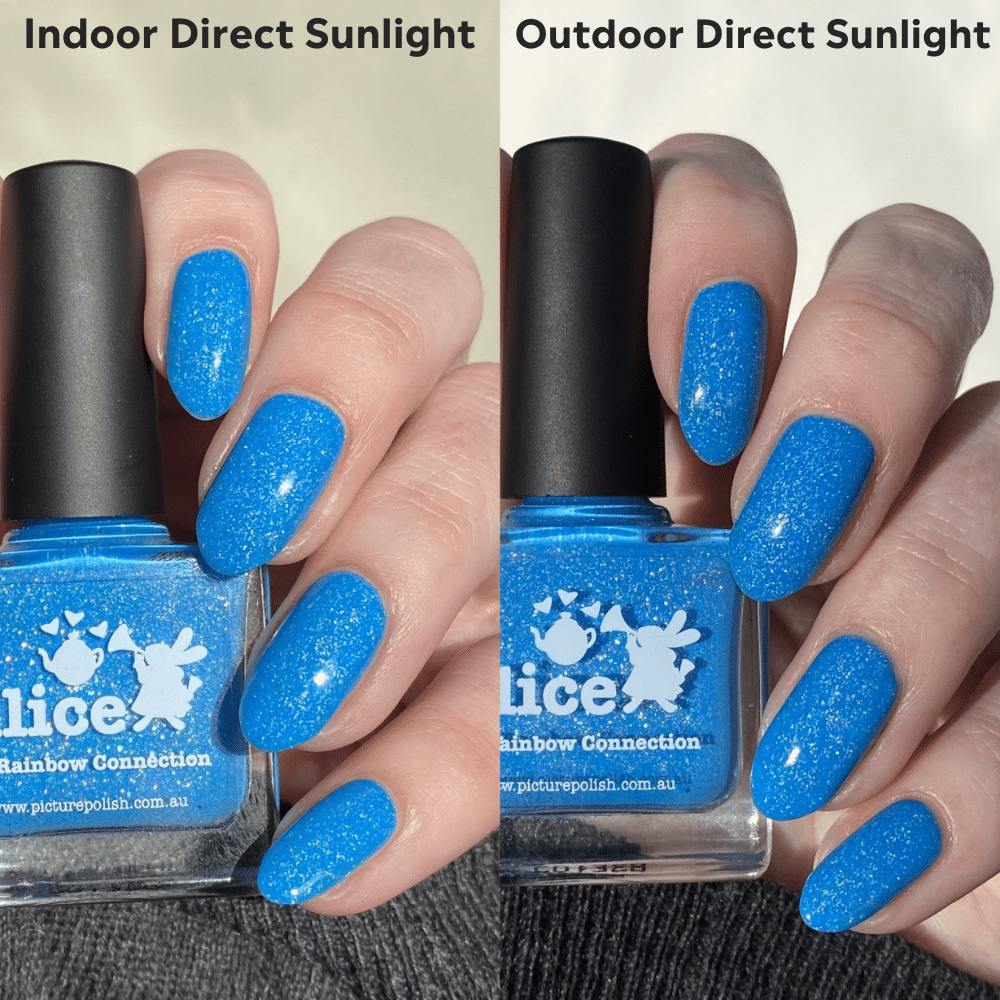
So, in short, direct sunlight for nail content has a real mix of pros and cons, depending on your needs. This is why it’s great to have additional indoor lighting options.
Since the beginning of the pandemic, at-home lighting options for social media content have become wildly available at any number of price points. Regarding all lighting choices, it’s wise to make sure there are control panels to adjust warmth and brightness levels. An off-on switch is good, but more specialized control can be beneficial.
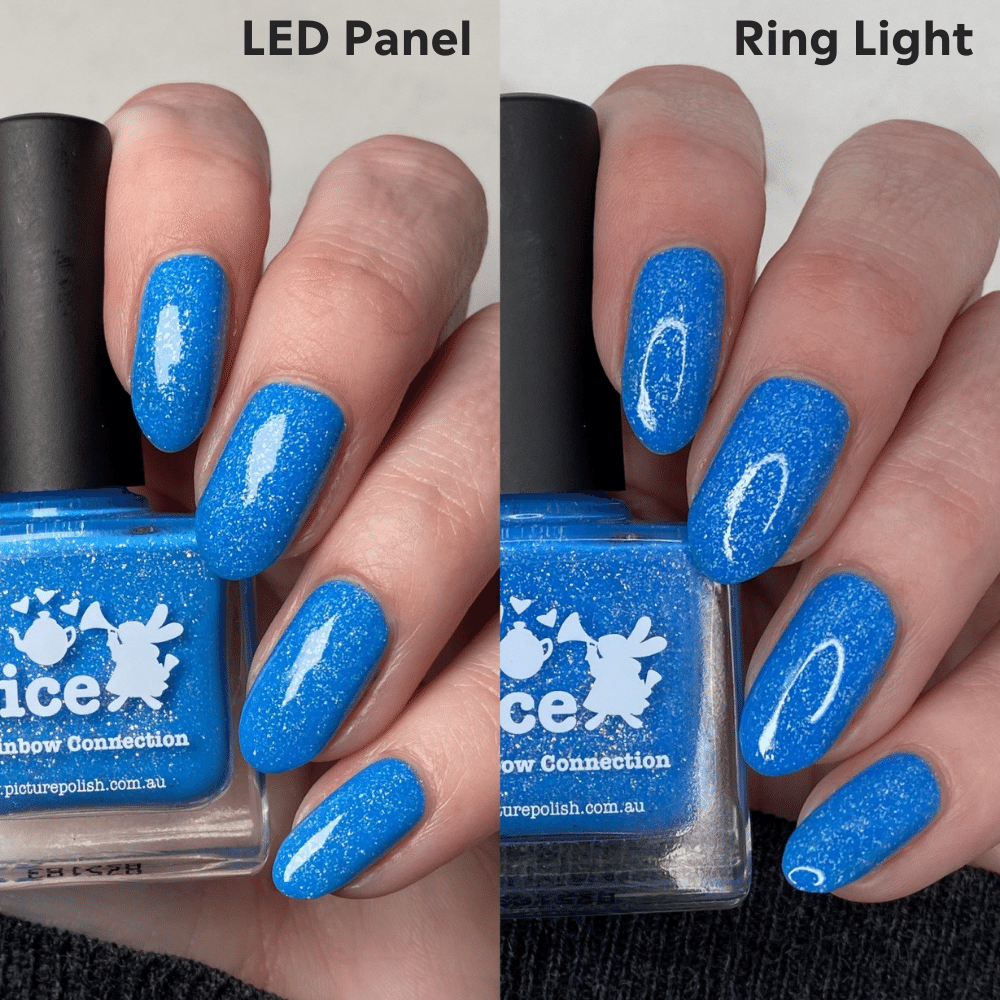
Ring light – A circular light designed to create a wash of light and minimize shadows.
PROS: Very broad scope of light that will highlight nail details with an overall softer skin appearance.
CONS: If using a glossy top coat, the ring light is very visible on nails and can distort art.
LED panel light – A square or rectangle-shaped light bursting with bright LEDs.
PROS: Fairly broad scope of light if angled correctly.
CONS: Shadows are visible as the light comes from one direction.
Rod light – A rod light is a long, thin light that lands somewhere between a ring light and panel light when it comes to shadows.
PROS: Most rod lights made explicitly for nail techs are very bright and create minimal reflection.
CONS: Arguably the most expensive lights to purchase, they take up more room than others, often requiring a tall stand or being clamped to a desk. I’d love to have a rod light, but they’re out of my price range, and I have nowhere to put it. Sigh.
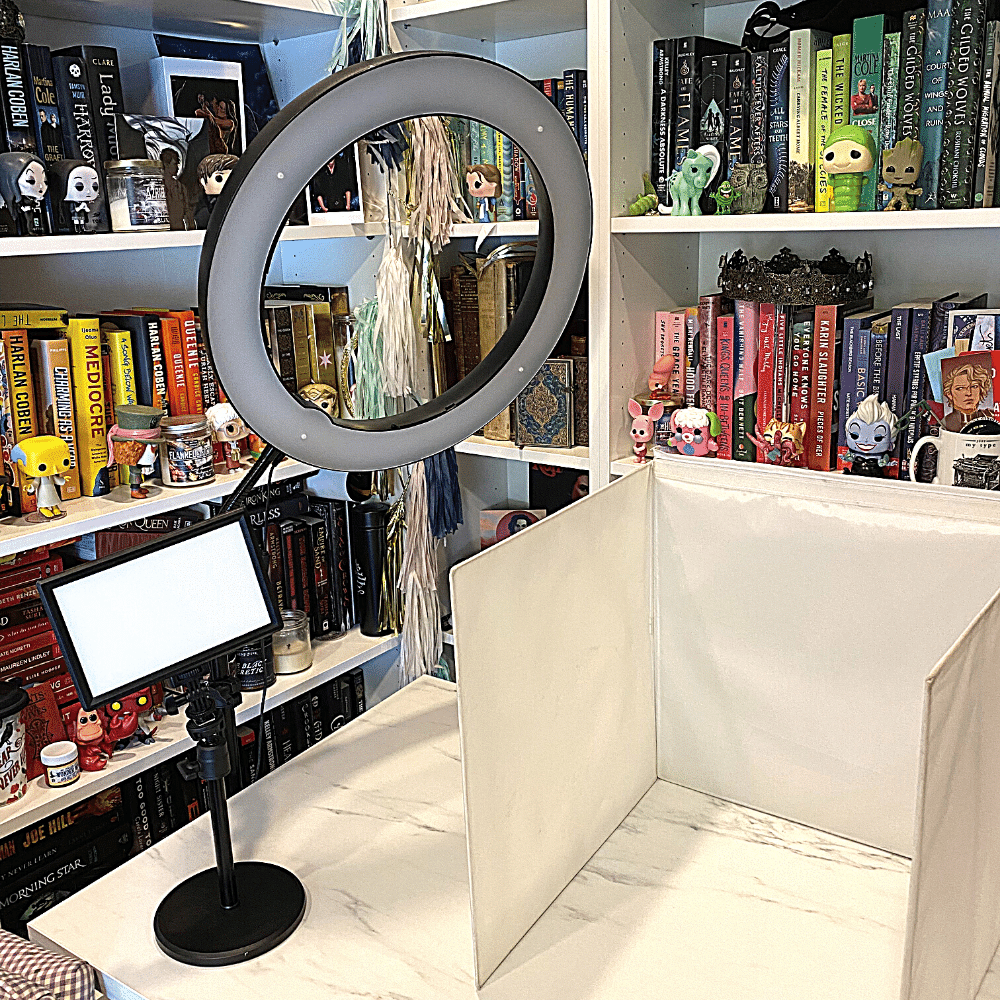
Softbox – A white box that reflects light.
Regardless of the lighting option, a softbox does just what the name implies. It softens and reflects light, which cuts down on shadows. Most fold up and are portable, making any surface ideal for nail pictures. Definitely a must-have! I use a ring light, rectangular LED light, and a softbox on top of a piece of discarded faux marble countertop. Because I am nothing if not classy.
Warm vs. Cool
Once you’ve decided on the best light for you, let’s talk about adjusting the warmth. Lighting temperature is measured in Kelvins, no matter which light you use. The higher the Kelvin (K), the higher the colour temperature. For instance, a light set to 5600K is equal to daylight, producing a cooler light. Warmer light between 1200-3900K offers a cozier feel, which explains why most home lighting lands on the lower Kelvin ranges.
This is where it can be easy to get lost or become uncertain, so to help, here are six pictures that were taken at different Kelvin settings. None have been edited in any way and were shot on an iPhone 11 Pro.
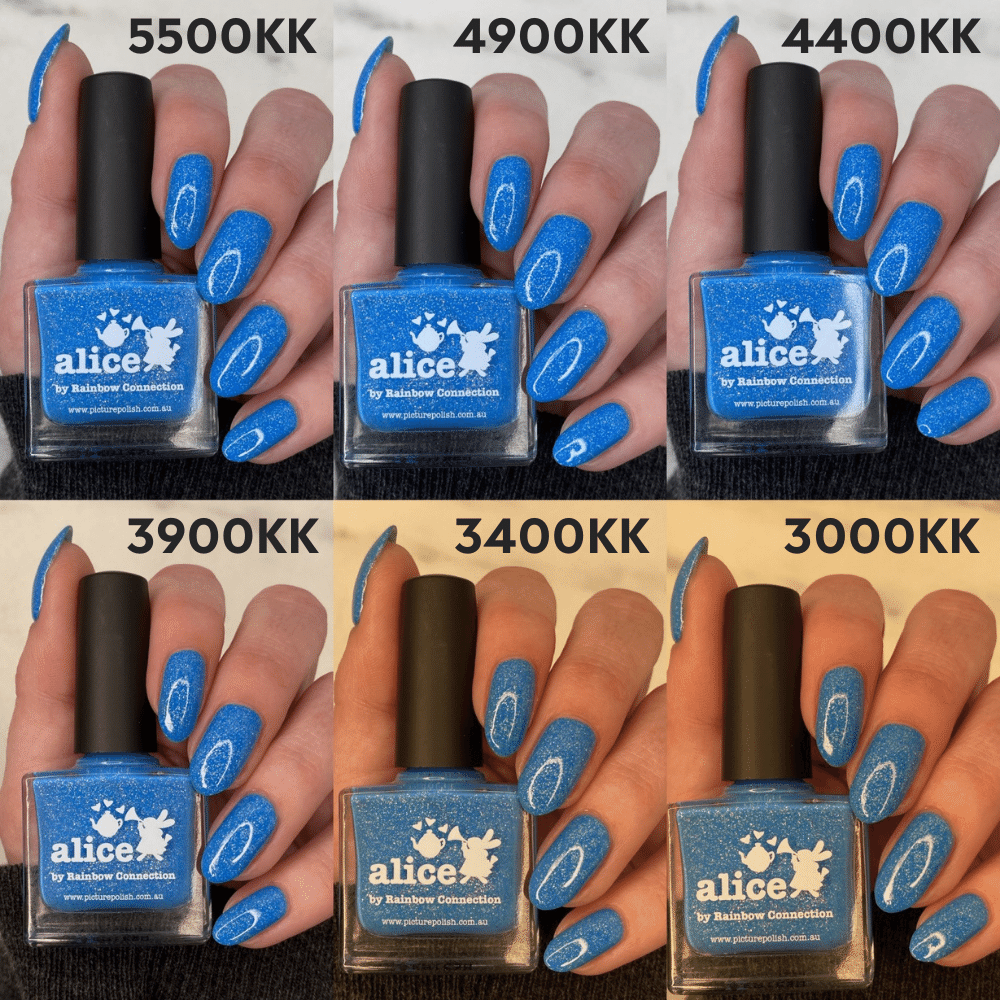
As you can see, lighting below 3900K creates a yellow wash on my white skin tone and skews the nail polish colour. Anything from 3900K to 3000K is just too yellow for me. I prefer to stay around 5100K for photos, but the best setting for you will vary. And even at 5100K, sometimes my skin looks too orange or red. I suggest playing around with a few settings and judging which works best.
And remember that some manis will still require colour correction in editing. But that editing will be minimal, therefore streamlining your content creations.
Pro Tip: Surprise fun fact! When used as a singular light source, lighting for nail content is more effective. That means turning off any other lighting in the room and staying away from windows. While it can seem like the more lighting sources, the better, it often isn’t the case. Choose one and stick with it to help save time.
Glossy vs. Matte Topcoat
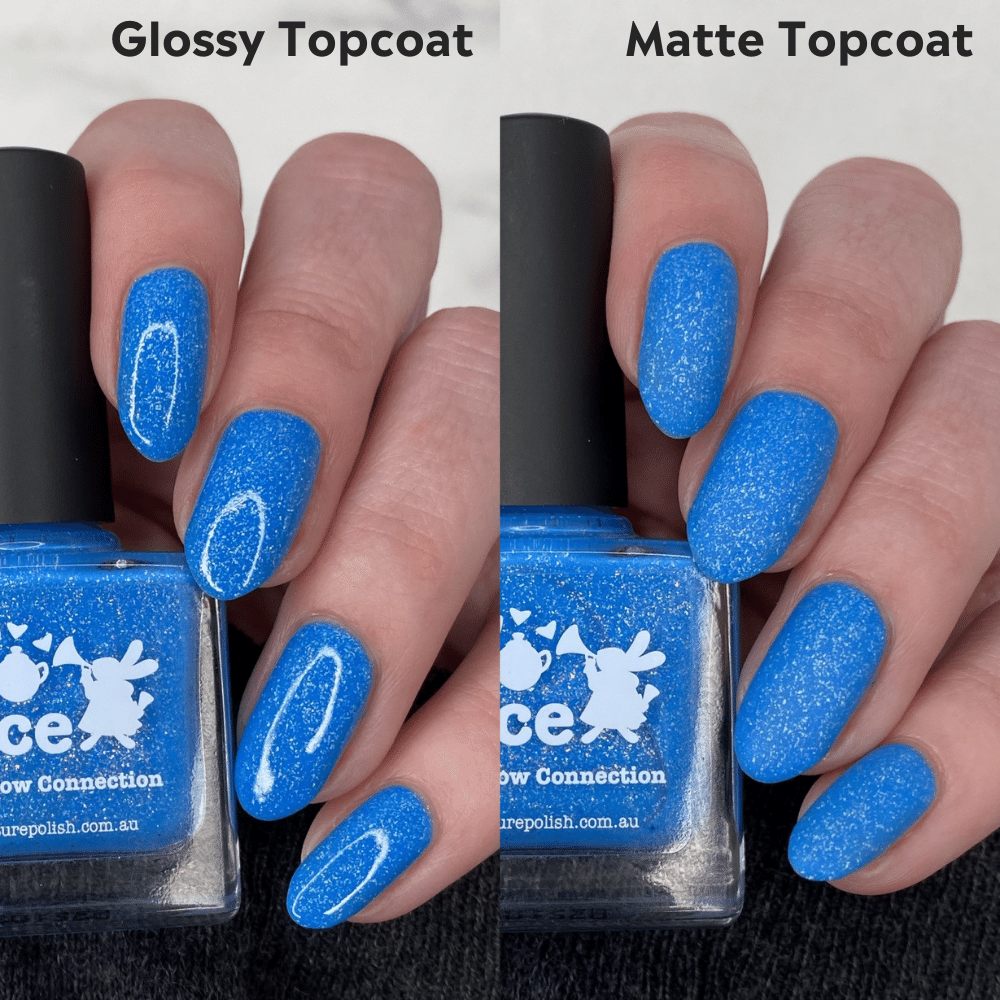
Okay, so you’ve chosen your light, created your own custom settings for skin tone and polish colours, and now you’re ready to take some photos of your latest nail triumph. The only bad news is that no matter how you pose your hand or arrange the light, a glossy topcoat reflects the light source.
Personally speaking, this is when direct sunlight shines, to pardon the pun. The reflection point of direct sunlight is the smallest of all the lighting options. This means your intricate details are easy to see, even with a glossy topcoat. And if it takes a little editing to soften skin, so be it.
But if you live in climate like mine that often has days without direct sunlight, the easiest solution is to add a matte topcoat. As you can see, the shine is taken away with no reflection at all. Depending on the matte top coat, you may have to slightly adjust the colours in editing if they appear too light, but that’s a reasonably easy fix. So when in doubt, add a matte topcoat. Plus, matte nails are fabulous, so there’s that, too.
And there you have it. I hope this brief lighting overview has helped demystify lighting for nail content. What other lighting advice do you have? Up next in the Social Media Series, we talk about tips for taking pictures, so stay tuned! And please tag @picturepolish so we can see your incredible nails!
Connect with Jennie on Instagram here.

Jennie Shaw is a writer and freehand nail artist. She is also an avid reader who pairs cover-inspired manicures with book reviews. Her work has been featured in Modern Salon, Nails Magazine, and on Goodreads. She lives in the Canadian countryside and can be found on Instagram @jennieshaw